 Apple OS X
Elsewhere [edit]
Related
Here's a collection of helpful tips for dealing with some of the lesser used and rougher edges of Apple's OS X.
Tips start with general utility then progess to more developer oriented.
Installation and Use FAQ [edit]
Terminal can not list Desktop files
2026-06 rickatech
System Settings > Files & Folders > Terminal > Desktop Folder
Toggle the area that you need terminal to be able to see.
It seems it is okay to ignore the restart terminal prompt.
Terminal scrolling past commands instead of console contents
2026-04 rickatech
Apparently terminal can get confused if it disconnects from another host improperly, leaving the scroll mode confused.
$ reset

  [ this should reset the scroll behavior ]
Apple Music vs iTunes Match Service
2023-09 rickatech
Apple Music is typically billed monthly and allow online access to Apple's extensive music library on any device that can the Apple Music program or web application.
iTunes Match is typically billed annually, and is geared toward large private music collators who have music not licensed with Apple or their large music catalog. iTunes Match allows devices with private audio tracks, ripped CD's and off Apple-platform purchased music to seamlessly be distributed to any device your Apple account can login into.
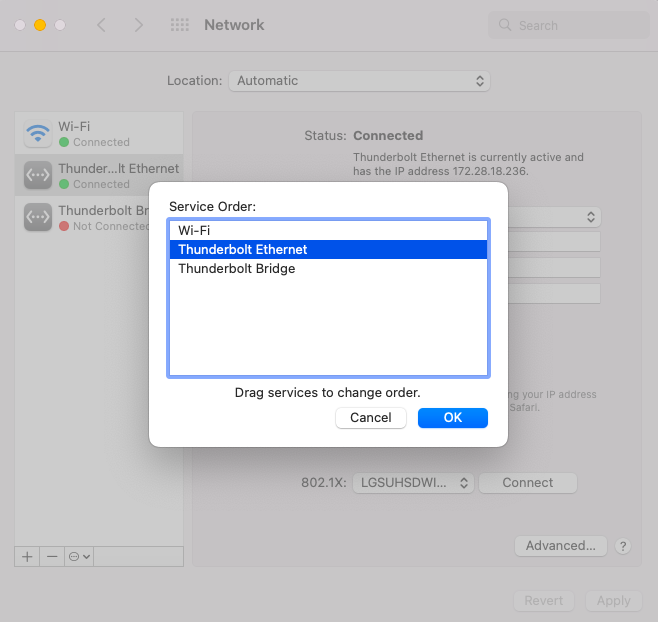
Occasionally a situation arises when it is helpful to have a Mac able to access two totally different networks. For example access to both a WiFi hotspot and a wired local area network not attached to the hotspot. Classic situation is when there is an office or home Internet outage, you can use a smartphone as a WiFi hotspot but that will not be able to network with other office computers or printers. One work around for this is to enable both the WiFi and Ethernet interfaces in the System Preference Network control panel. Likely the Ethernet will need to be given a manual IP address, mask, and router IP (use the hotspot IP) but there is an additional step that might be needed. The network interfaces Service Order priorities may need to be adjusted as well (see image).
MacBook WiFi Hangs
2023-03 rickatech
Noticed this on an older MacOS Majove 10.14.6 system. The WiFi fan icon top of the screen is unclickable / frozen, short of a restart it will remain unresponsive.
$ sudo su -

# ps ax | grep air

  147   ??  Ss     9:04.47 /usr/libexec/airportd

  [ your system may have a process other than 147, use that ]

# kill 147

  [ check if the WiFi starts searching/working again ]

# exit
NFS - Network File System
2022-03 rickatech
Like Unix/Linux systems, MacOS supports Network File System exporting and connecting. You will need to have root access to adjust the corresponding configuration files accordingly.
# cat /etc/exports

  /Users/public/nfs_new -network 172.28.18.0 -mask 255.255.255.0

# showmount -a

  All mounts on localhost:
  172.28.18.89:/Users/public/nfs_new

# sudo nfsd restart

  [ if the exports configuration changes, may need to restart the nfs service ].
Catalina - Root Folder, Groups, Installing Unverified Applications
2020-12 rickatech
As of MacOS 10.15/Catalina, users can no longer create new folders in the top directory of the main disk and there are more constrains on running software by unidentified developers. Symbolic links can be used to allow folders in more user accessible area to be mapped to root disk directory. Administrator users can allow unidentified software once installed to be run without further interaction by allowing in Security and Privacy System Preferences.
For example, perhaps in the past for some reason your created a /public directory. That is not possible anymore. As an administrative user one could create /Users/public. Also there are still ways to have symbolic links added to the root directory.
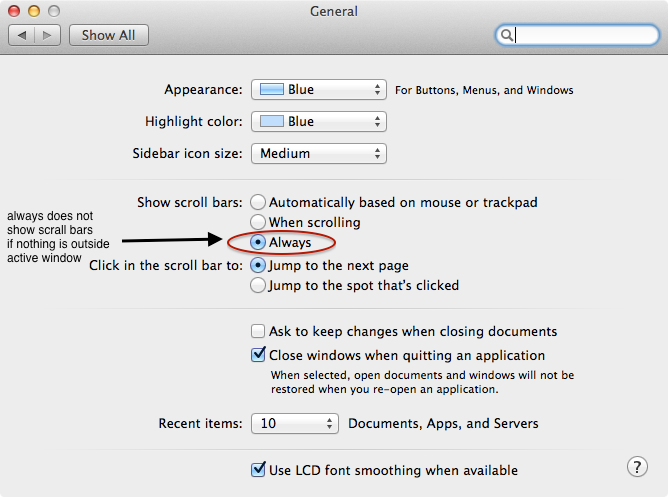
Around OS 10.7 Apple changed the default behavior for window scroll bars, making them disappear unless one is actively moving the cursor around. While this may be comforting for new users coming from mostly mobile experience, it undermines the powerful desktop workstation metaphor by removing important presentation context. So much so that certain applications like remote desktops become strange and unusable. Turns out there is a general preferences settings to restore the classic time tested scrollbar behavior.
Making Free OS X Install Media
As of at least OS X 10.9 (Mavericks), and as well with OS X 10.10 (Yosemite), Apple no longer offers DVD or other commercially available install media. However, they do provide a free download and tools for preparing install media. Key to this is to have either a larger than 16 GByte writable USB device, or a DVD burning and blank DVD media able to hold 8+ GByte install images files.
Missing Admin Account
To be able to install software (e.g. updated Adobe Flash player), add users, change administrative settings, and more at least one user account needs to have administrator capabilities. Sometimes the password of the administrator user is lost for some reason. There are quite a few ways to re-establish an account with administrator capabilities.
Time Machine - Targeting a Remote External Disk
2018-04 rickatech
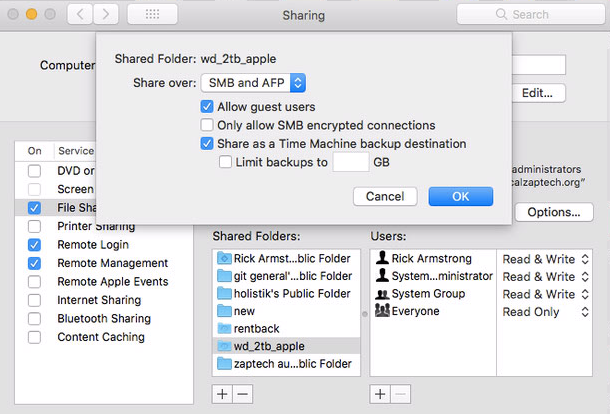
It can be very convenient to have a desktop Mac allow time machine backups to external disks attached to it. The computer trying to connect to the remote disk will need to target the disk in the Time Machine Preferences control panel, but there may be a setting to allow it to see the remote external drive. The computer with the external disk directly attached needs to enable File Sharing, then double click to open advanced settings and make sure Share as a Time Machine backup destination is checked.
Time Machine - File System Format
Most people just accept the default settings when setting up OS X, if so Time Machine should work as expected. However, if for some reason you decide to format OS X disk using Case-sensitive (Case-insensitive is default), Time Machine then becomes very picky. Time Machine must be used with a primary and backup disk that use the same Case-sensitibity setting. Otherwise it will adroitly alert you that it will not work. Even just trying to copy Time Machine files to a different disk where the Case-sensitivity is different won't work.
Default OS install disables access to root shell. With 10.6.X, the System Preferences > Account panel offers a way to access controls that enable root login access.
For scripts and other direct email generation to work, need to configurate some obscure OS X settings to specify what host to use to send email so that it reaches the Internet. Be careful, spam protection measures on many networks discourage sending email directly from a host - so your mileage may vary.
# scutil --set HostName mini.local.zaptech.org

  ...

# scutil --get HostName

  mini.local.zaptech.org
# diff -r1.1 /etc/postfix/main.cf

  306a307
  > relayhost = smtp.sonic.net
$ diff httpd.orig httpd.conf

  361c361,362
  < DocumentRoot "/Library/WebServer/Documents"
  ---
  > # DocumentRoot "/Library/WebServer/Documents"
  > DocumentRoot "/public"
  386c387,388
  < < Directory "/Library/WebServer/Documents">
  ---
  > # <Directory "/Library/WebServer/Documents">
  > <Directory "/public">
# apachectl

  usage: /usr/sbin/apachectl (start|...|help)

  start      - start httpd
  stop       - stop httpd
  restart    - restart httpd if running by sending a SIGHUP or start if
               not running
  fullstatus - dump a full status screen; requires lynx and mod_status enabled
  status     - dump a short status screen; requires lynx and mod_status enabled
  graceful   - do a graceful restart by sending a SIGUSR1 or start if not running
  configtest - do a configuration syntax test
help - this screenMany Unix/Linux commands co-exist with OS X nicely. However the deep internals of OS X differ somewhat from its operating systems brethren.&nbps; For example creating and managing users and groups from the command line uses OS X specific commands not found elsewhere, but file operations otherwise closely adhere to common commands.
Code Development Tips [edit]
Apple built their legacy on top of MacOS desktop operating system (AKA OSX), but more recently have become the dominant player in the mobile device market with their mobile phone, tablets, and AppleTV products that are built on top of iOS. Developing application for either MacOS or iOS is best done using Apple's Xcode development tools, which are free and run on MacOs.
Mac Ports is an alternative to brew for bringing over popular open source tools from Linux to MacOS. It's much lighter weight, keeps all tools in /opt separate from Apple's tools, and can be operated completely from the command line. Also, it seems to support a variety of common Linux tools recently dropped from Xcode as of Sierra (e.g. rcs).
Update
rickatech, 202506
$ port version
$ sudo port install rcs
$ sudo port -v selfupdate
Original
$ which rcs

  /usr/local/bin/rcs

$ ls -lh /usr/local/bin/rcs

  lrwxr-xr-x rickatech admin 29B Feb 26 2018 /usr/local/bin/rcs -> ../Cellar/rcs/5.9.4_1/bin/rcs

  [ before High Sierra ]

- - - - - - -

$ port version

  Version: 2.5.3

$ sudo port selfupdate

  --->  Updating MacPorts base sources using rsync
  MacPorts base version 2.5.3 installed,
  MacPorts base version 2.5.3 downloaded.
  --->  Updating the ports tree
  --->  MacPorts base is already the latest version

  The ports tree has been updated. To upgrade your installed ports, you should run
  port upgrade outdated

$ sudo port upgrade outdated

  Nothing to upgrade.

$ port search rcs

  rcs @5.9.4_1 (devel)
  Revision Control System

$ sudo port install rcs

  ...

$ which rcs

  /opt/local/bin/rcs

$ rcsdiff notes.txt

  ===================================================================
  RCS file: RCS/notes.txt,v
  retrieving revision 1.1
  diff -r1.1 notes.txt
Image Rotation
Command Line - sips (lossy)
$ sips -r 270 DSC00013.JPG --out DSC00013r.JPG

  .../DSC00013.JPG
  <CGColor 0x10fff0> [<CGColorSpace 0xa01bddc0>
  (kCGColorSpaceDeviceRGB)] ( 0 0 0 1 )
  .../DSC00013r.JPG
Command Line CVS / RCS
Apple includes command line CVS / RCS with Xcode from Apple. Download the latest relevent Xcode installer for your version of OS X. Do the bare minimum install. This will place CVS and and RCS commands typically in the /Developer/usr/bin directory. From a shell, attempt to run cvs, if it can't be found then create/modify .profile for you login accordingly.
$ cd ~

$ cat .profile

  export PATH=$PATH:/Developer/usr/bin
Elsewhere
Alas, MacCvsX (based in part on the WinCvs GUI client), seems to no longer be supported natively by OS X 10.6 . Instead a prompt to enable Roseta emulation occurs, which indicated old PowerPC code has been detected. Still, if you don't mind running in emulation mode MacCvsX will launch but seems to be highly unstable. Perhaps an updated MacCvsX version will surface soon that runs directly and is more stable.
Miscellaneous Command Line Tips
$ sw_vers

  ProductName: Mac OS X
  ProductVersion: 10.6.8
  BuildVersion: 10K549
legacy notes [edit]
circa 2013
Related
Elsewhere
File Sharing 1: Basics
File Sharing 2: Disabling User Shares
File Sharing 3: OS X (10.3)
With OS X 10.3 additional fields are required to enable file sharing for Apple Talk. There are freeware tools that help adjust the necessary settings. It should still be possible to set this up using only NetInfo manager - stay tuned.
Change Hosts Settings
Default OS install disables /etc/hosts and instead uses Netinfo Manager to control equivelent functionality. Use NetInfo Manager to edit / machines . Often duplicating an exiting entry then editing to suit your needs works nicely. If you need to have several hosts with same IP address, use a single entry and add additional name properties. Note: property serves ./local does not seem pertinent but it doesn't hurt either.
Default OS install disables access to root shell. Until 10.5.X and later, use Directory Utility after authenticating with an existing Admin enabled account. For OS X 10.4.X and before use NetInfo Manager, menu: Domain; Security to change this.
As of at least OS X 10.3, it seems the graphical login can be used to gain root access. However, only the standard users will be displayed. Holding Option Return, then clicking a user will present a password + username prompt (typically only password prompt is presented) - so root user and password can be entered.
Also, if root user is enabled using NetInfo Manager, the graphical login will present an Other User which will directly present username + password prompt.
MacCvs Bugs
 Under certain circumstances MacCvs will do some rather preculiar things with binary files.
Since most people run OS X on the 'classic' HFS file system, cvs clients have to deal
with resource and data portions of files. MacCvs default is to archive files with resources
into HQX format before commiting to the repository. Problem is, platforms that don't
use HQX or suport HFS files systems (like Linux, and Windows) see these binary files
as scrambled.
Under certain circumstances MacCvs will do some rather preculiar things with binary files.
Since most people run OS X on the 'classic' HFS file system, cvs clients have to deal
with resource and data portions of files. MacCvs default is to archive files with resources
into HQX format before commiting to the repository. Problem is, platforms that don't
use HQX or suport HFS files systems (like Linux, and Windows) see these binary files
as scrambled.
For files that actually have meaningful resource data this is a non issue since
the file probably is specific to Apple platforms. However, it is very common for
normal binary files (MS Word, images, ...) to collect superfluous resource information
and MacCvs dutifully scrambles the file when committing it to the repository assuming
that it is Apple platform specific. Bad!
Enter a special tool for OS X:
File Adopter . This tool allows
you to determine the magic 4 character File Type of a file under OS X.
File types can be entered into MacCvs binary preferences. For each file type
entered it can be further configured to perform plain data
uploads instead of HQX scrambling the file during commit. Yes!