 AWS
AWS
Amazon Web Services
2016-03, rickatech
Elsewhere [ edit ]
Since the early 2000's, Amazon has been pioneering and leading the Internet technology cloud services industry.
Products, Common Terms
An EC2 instance is a virtual server, hosted by Amazon in one of several geographically distinct data centers. The instance can be one of several pre-installed Operating System flavors including various versions of Microsoft Windows and Linux. Once created, it behaves just like a stand alone server, but it may also be integrated with various other Amazon services like S3 (stand alone storage), and Elastic IP (persistent public IP address). Setup and management of an EC2 instance is done through the AWS web console, which requires an Amazon account to access.
Setting Up an EC2 Instance
Elsewhere
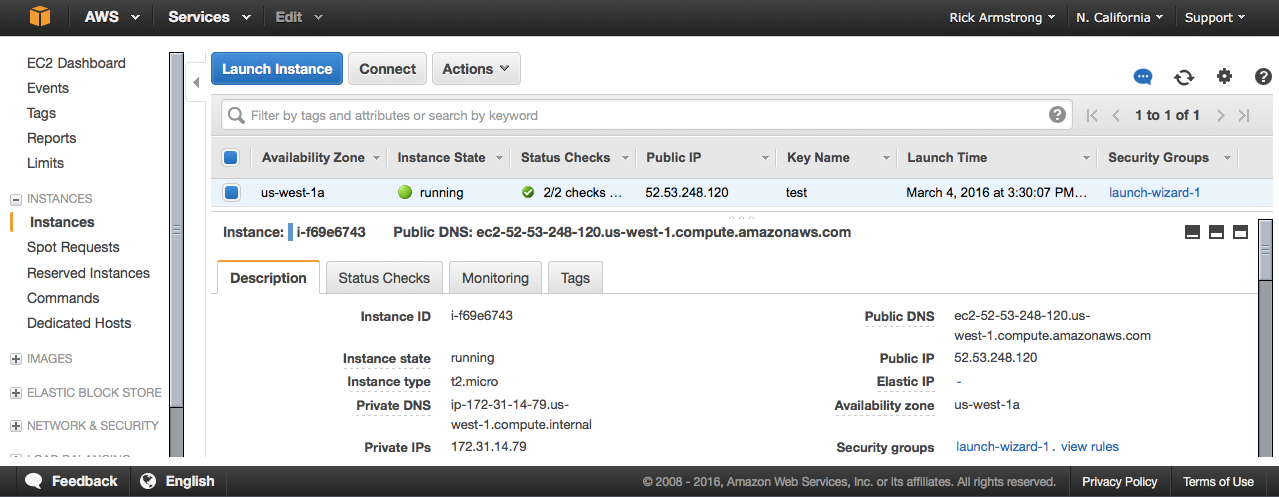
Before establishing an EC2 instance, review the possible geographic locations available and make a note of which web based console to use. As of this writing locations include: us-west-1, ... Using the appropriate console for your desired geographic region, choose the size of memory, disk, and bandwidth for your EC2. For evaluation instances, there is usually a free trial option for a minimal load, low storage/bandwidth instanced.
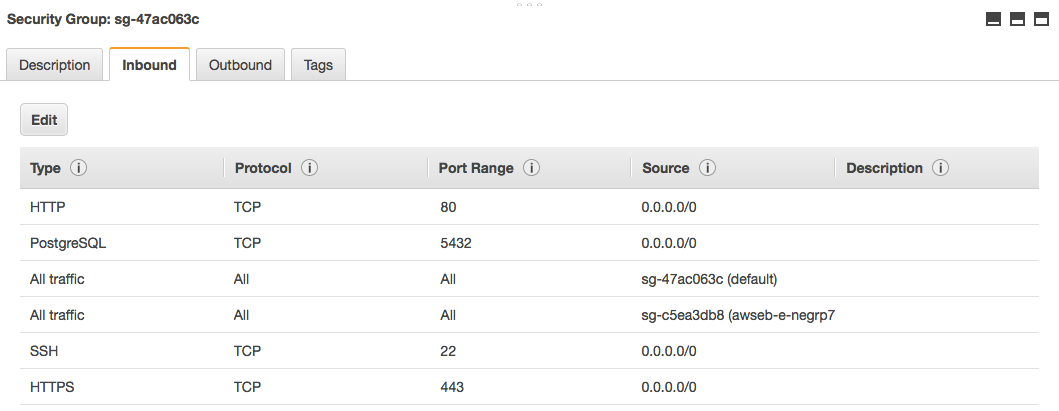
There are a few caveats to consider before you create an EC2 instance. Typically a public routable external IP address will be connected via NAT to a private internal IP address for a given EC2. Unless you take the extra step to link an Elastic IP Address to a virtual server, a different external public IP address will be invoked each time it boots up. Every EC2 instance is also protected by a security profile call a Security Group. Typically the Security Group policy only allows SSH port 22 connections initially. By editing the associated Security Group, HTTP and other service port connections can be allowed independent of any the native EC2 firewall services (e.g. iptables) that may be enabled. Also it is possible to build an EC2 with no external public IP address for applications that just need data processing with no ability to service requests from the public.
During the creation process, a security certificate will be issued or an existing certificate will be asked for. Make sure to carefully save this certificate, as it will be critical to reference it when using SSH for initial connections to your EC2 instance, at least for Linux OS based virtual servers.
Use web console to create an EC2 instance
us-west-1: https://us-west-1.console.aws.amazon.com/

[ choose existing security certificate file / or create and save a new one ]

$ ssh -i /public/holistik/aws/test.pem ec2-user@54.211.111.11

$ sudo su -

# cat /etc/group | grep wheel

  wheel:x:10:ec2-user

# yum install mod24_ssl

  [ this purposefully DOES not install https (which is version 22,
but http version 24 instead ] Setting to enable ssh without key pairs / password based login (as of 2020-02)
$diff sshd_config

  38a39
  > PermitRootLogin no
  63c64
  < #PasswordAuthentication yes
  ---
  > PasswordAuthentication yes
  65d65
  < PasswordAuthentication no.
Security Groups (shortcut)
Apart from the direct networking aspects of an EC2, Amazon imposes a separate independent network connection firewall. So even if an EC2 is setup to promiscuously accept connections from anywhere, only connections allowed in the independent security group attached to that EC2 would be enabled..
Cost Reducing Tips
Cloud9 (as of 202006)
Certain AWS services like Cloud9 allow users to create EC2 instances. However, even when those instances and users are deleted they may leave snapshots behind that can cause lingering storage charges.
For such services, use the ECS dashboard to check for Security Groups. Likely it will show a number that is more than one, indicating there may be lingering snaphots. Click on Security Groups, then see the list and notice the VPC ID column. Clicking on a VPC ID will bring up a list which may include many rows of snapshots. To save costs, remove the rows that are no longer important.
Amazon Linux 2
2021-03, rickatech
With Amazon Linux 2, AWS now supports modern Linux systemd. This means slightly different package support and a slightly different set of commands for administration.
Amazon Linux 2 - certbot
Elsewhere
# yum repolist

  repo id                             repo name
  !amzn2-core/2/x86_64                Amazon Linux 2 core repository
  amzn2extra-docker/2/x86_64          Amazon Extras repo for docker
  amzn2extra-php7.3/2/x86_64          Amazon Extras repo for php7.3
  amzn2extra-postgresql11/2/x86_64    Amazon Extras repo for postgresql11

# wget -O epel.rpm –nv https://dl.fedoraproject.org/pub/epel/epel-release-latest-7.noarch.rpm

# ls -lh epel.rpm

  epel.rpm

# yum install epel.rpm

  ...

# yum repolist

  repo id                             repo name
  amzn2-core/2/x86_64                 Amazon Linux 2 core repository
  amzn2extra-docker/2/x86_64          Amazon Extras repo for docker
  amzn2extra-php7.3/2/x86_64          Amazon Extras repo for php7.3
  amzn2extra-postgresql11/2/x86_64    Amazon Extras repo for postgresql11
  epel/x86_64                         Extra Packages for Enterprise Linux 7 - x86_64

# yum list \*certbot\*

  Available Packages
  certbot.noarch
  python2-certbot.noarch
  ...

# yum install python2-certbot-apache.noarch

  ...

# yum upgrade python2-certbot-apache.noarch

  ...

# certbot certonly --apache

  [ first time is will ask for email to support EFF
    choose the number of the domain to get a cert for ]

  Which names would you like to activate HTTPS for?
  1: aws-al03.proloop.com
  2: rk04.proloop.com
  3: wg01.proloop.com

  IMPORTANT NOTES:
   - Congratulations! Your certificate and chain have been saved at:
     /etc/letsencrypt/live/aws-al03.proloop.com/fullchain.pem
     Your key file has been saved at:
     /etc/letsencrypt/live/aws-al03.proloop.com/privkey.pem
     Your certificate will expire on 2021-06-07. To obtain a new or
     tweaked version of this certificate in the future, simply run
     certbot again. To non-interactively renew *all* of your
     certificates, run "certbot renew"
If you selected all domains, then a single certificate file set was generated in /etc/letsencrypt/live/.... Now you need to carefully look at your virtual hosts configurations and point their certificate paths at the newly created certificate file set.
# certbot certonly --apache

  [ run this every three months or so ]

# systemctl restart httpd
Alternatively, each domain can be renewed thusly (run every few months).
# certbot run  --apache -d rk04.proloop.com

  Deploying Certificate to VirtualHost /etc/httpd/conf.d/ssl_rk04.conf
  Redirecting vhost in /etc/httpd/conf.d/ssl_rk04.conf to ssl vhost in /etc/httpd/conf.d/ssl_rk04.conf

  Congratulations! You have successfully enabled https://rk04.proloop.com

  IMPORTANT NOTES:
   - Congratulations! Your certificate and chain have been saved at:
     /etc/letsencrypt/live/rk04.proloop.com/fullchain.pem
     Your key file has been saved at:
     /etc/letsencrypt/live/rk04.proloop.com/privkey.pem
     Your certificate will expire on 2021-06-07. To obtain a new or
     tweaked version of this certificate in the future, simply run
     certbot again with the "certonly" option. To non-interactively
     renew *all* of your certificates, run "certbot renew"